Customer Reviews | Contact | FAQ
How to Hang a Rug on the Wall: 7+ Methods Explained (Step-by-Step)
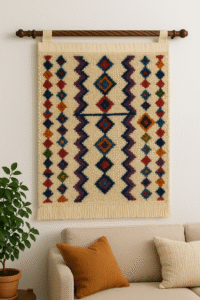
Transforming an ordinary wall into a stunning focal point is as simple as hanging a beautiful rug. Whether you’ve acquired a prized Moroccan rug, inherited a family heirloom, or simply want to showcase a favorite textile piece, wall-mounted rugs add texture, color, and artistry to any space. But knowing how to hang a rug on the wall properly ensures both the safety of your textile and the beauty of your display.
As home décor specialists who have guided countless clients through the process of wall hanging rugs, we understand the challenges involved—from choosing the right mounting method to preventing damage to both your wall and your treasured textile. The good news? With the right approach, hanging your rug can be straightforward and yield professional results.
In this comprehensive guide, we’ll walk through everything you need to consider before hanging your rug and provide step-by-step instructions for seven proven methods—from simple Velcro solutions to professional conservation techniques. Whether you’re hanging a lightweight kilim or a substantial Moroccan rug, you’ll find the perfect solution for your specific needs.
Essential Pre-Hanging Considerations
Before drilling any holes or purchasing supplies, taking time to assess your rug, wall, and placement will save you frustration and potential damage.
Assess Your Rug
Weight: Perhaps the most crucial factor when deciding how to hang your rug is its weight. A lightweight flatweave can be supported by different methods than a heavy, thick pile rug.
- Lightweight (under 5 lbs): Flatweaves, dhurries, kilims
- Medium (5-15 lbs): Most decorative rugs, smaller wool rugs
- Heavy (15+ lbs): Large wool rugs, dense pile Moroccan rugs, older Oriental rugs
Size & Shape: The dimensions of your rug will influence both placement and hanging method. Measure carefully and consider proportions relative to your wall space.
Material & Construction: Different rug types require special consideration:
- Moroccan rugs often have loose weaves that can stretch over time
- Oriental rugs may be delicate and valuable, requiring non-invasive methods
- Kilims are typically flat and lightweight but may be fragile due to age
- Backing type determines which attachment methods are suitable
Value & Sentimentality: For valuable or irreplaceable pieces, prioritize non-damaging methods or consider professional installation.
Assess Your Wall
Wall Type:
- Drywall: Most common; requires anchors for heavier items
- Plaster: Often in older homes; more brittle than drywall and requires special anchors
- Brick/Concrete: Requires masonry drill bits and appropriate anchors
- Wood Paneling: May provide natural anchor points
Finding Studs: For heavier rugs, mounting into wall studs provides the most secure support. Use a stud finder to locate them before planning your installation.
Existing Utilities: Always check for electrical wires, plumbing, or other utilities before drilling into any wall. A simple stud finder with wire detection can prevent costly accidents.
Plan Your Placement
- Height: Eye level is generally ideal for viewing, with the center of the rug positioned approximately 57-60 inches from the floor
- Centering: Consider balance within the space, especially in relation to furniture below
- Lighting: Think about how natural and artificial light will highlight (or potentially damage) your wall hanging rug
Basic Tools You’ll Need
- Tape measure
- Level
- Pencil for marking
- Drill (for some methods)
- Stud finder
- Step ladder
7 Methods for Hanging a Rug on the Wall
Method 1: Velcro (Hook-and-Loop)

Best For: Lightweight to medium rugs, flat weaves, less permanent installations, drywall walls
Pros:
- Relatively easy installation
- Invisible from the front
- Distributes weight evenly across the rug
- No specialized tools required
Cons:
- Adhesive can fail over time
- Not suitable for very heavy rugs
- Sewing required for best long-term results
- May damage paint when removed
Materials Needed:
- Heavy-duty Velcro strips (2-3 inches wide)
- Needle and heavy-duty thread (preferred) OR fabric adhesive
- Scissors
- Measuring tape
- Level
Step-by-Step Instructions:
- Prepare the rug by laying it flat, backing side up. Clean the backing if necessary.
- Measure and cut the Velcro strips to fit across the top edge and potentially sides of the rug. For rugs wider than 3 feet, add vertical strips every 2-3 feet for additional support.
- Attach the soft loop side to the rug:
- Sewing method (recommended): Hand-stitch the loop side to the rug backing using a whipstitch along all edges of the Velcro.
- Adhesive method: Apply fabric adhesive to the Velcro and press firmly onto the rug backing. Allow 24 hours to cure completely.
- Measure and mark the wall placement using a pencil and level to ensure straight alignment.
- Attach the hook side to the wall by removing the backing and pressing firmly against the wall, following your level line.
- Press the rug firmly onto the wall Velcro, starting from one end and working across to avoid wrinkles or sagging.
Method 2: Casing and Rod
Best For: Medium to heavy rugs, permanent displays, achieving a professional look
Pros:
- Very secure and professional appearance
- Distributes weight evenly
- Can be removed/replaced easily
- Works well for most wall hanging rugs
Cons:
- Requires sewing skills or professional assistance
- Creates permanent alteration to the rug
- Needs proper wall anchoring for heavier rugs
Materials Needed:
- Curtain rod or wooden dowel slightly wider than your rug
- Rod brackets and appropriate wall anchors
- Heavy fabric for casing (if not sewing directly to rug)
- Heavy-duty thread and needle
- Drill and appropriate bits
- Stud finder
- Level
Step-by-Step Instructions:
- Create a fabric casing either by:
- Sewing directly to the rug: Fold over 3-4 inches of the top edge and stitch securely to create a sleeve.
- Creating a separate sleeve: Sew a fabric tube slightly wider than your rug and attach it to the back of the rug.
- Select an appropriate rod that can support your rug’s weight. Curtain rods work well for lighter rugs; heavier rugs may require a sturdy wooden dowel.
- Locate and mark wall studs where your rod brackets will be mounted.
- Install rod brackets using appropriate anchors. For heavy rugs, mounting into studs is essential.
- Slide the rod through the fabric casing.
- Mount the rod on the installed brackets and ensure it’s secure before releasing.
Variation: Using Clips or Rings If you prefer not to sew a casing, you can:
- Purchase decorative curtain clips or specialized rug hanging clips
- Attach clips evenly along the top edge of the rug
- Hang the clips on a mounted curtain rod
Method 3: Carpet Tack Strips

Best For: Heavier rugs, secure long-term installations
Pros:
- Extremely secure for heavier rugs
- Invisible from the front
- Can handle substantial weight
Cons:
- May damage the rug if not carefully installed
- Creates permanent holes in the wall
- More difficult to remove or reposition
Materials Needed:
- Carpet tack strips (available at hardware stores)
- Hammer
- Wall anchors appropriate for your wall type
- Drill
- Level
- Heavy-duty gloves (to protect from sharp tacks)
Step-by-Step Instructions:
- Cut the tack strips to fit the top and potentially sides of your rug.
- Mark the desired position on your wall with a pencil, using a level to ensure straightness.
- Install the tack strips on the wall using appropriate anchors, with the tacks pointing upward at the top and outward on the sides.
- Carefully position your rug against the top strip first, pressing the backing onto the tacks.
- Work your way down the sides if using side strips, ensuring the rug remains straight and taut.
Warning: This method can damage rugs if not done carefully. It’s best for rugs with sturdy backings and is not recommended for antique or highly valuable pieces.
Method 4: Specialty Rug Clips/Clamps

Best For: Display flexibility, medium-weight rugs, preserving rug condition
Pros:
- No permanent alteration to the rug
- Adjustable and repositionable
- Available in decorative styles
- Good for wall hanging rug displays that change seasonally
Cons:
- Visible hardware (though some are decorative)
- May create stress points on the rug
- Limited weight capacity for most clips
Materials Needed:
- Rug hanging clips or clamps (various styles available)
- Appropriate wall anchors
- Drill
- Level
- Wire or rod (depending on clip system)
Step-by-Step Instructions:
- Select appropriate clips based on your rug’s weight and thickness.
- Mark your desired hanging position on the wall, ensuring level placement.
- Install mounting hardware according to the specific clip system’s instructions.
- Attach clips to the rug evenly across the top edge, typically every 8-12 inches.
- Hang the clips on your installed hardware system.
- Check that weight is evenly distributed and adjust clip positions if necessary.
Method 5: Mounting on a Frame/Stretcher Bars

Best For: Displaying as formal art, preserving valuable or fragile textiles, flatweaves
Pros:
- Professional museum-quality presentation
- Prevents sagging and stretching
- Protects the rug from wall contact
- Excellent for valuable or fragile pieces
Cons:
- Most expensive option
- May require professional assistance
- Adds bulk to the display
Materials Needed:
- Wooden stretcher bars or frame in appropriate size
- Staple gun and staples (archival quality preferred)
- Cotton or linen backing fabric
- Acid-free mounting materials
- Picture hanging hardware
Step-by-Step Instructions:
- Assemble the stretcher frame to match your rug dimensions.
- Cover the frame with acid-free backing material, pulled taut and stapled to the back.
- Center your rug on the frame and carefully secure it, working from the center outward.
- For valuable rugs, consider having this done by a textile conservator who will use proper archival methods.
- Attach appropriate hanging hardware to the frame based on its weight.
- Hang using wall anchors appropriate for the total weight.
Method 6: Renter-Friendly / Damage-Free Options

Best For: Temporary installations, very lightweight rugs, rental properties
Pros:
- No wall damage
- Easy to reposition
- No permanent alterations to the rug
Cons:
- Very limited weight capacity
- Higher risk of falling
- May not last long-term
Materials Needed:
- Heavy-duty Command strips (hook and loop style)
- Removable adhesive hooks
- Lightweight hanging rod (for some methods)
Step-by-Step Instructions:
- Select appropriate command strips rated for the weight of your rug (typically limited to 4-5 pounds maximum).
- Thoroughly clean both the wall surface and the back of the rug where strips will adhere.
- Apply strips according to package directions, typically placing pairs every 12 inches across the top of the rug.
- Allow adhesive to bond fully before hanging weight (usually 1 hour).
- Carefully mount the rug, avoiding any pulling or tugging that might dislodge the adhesive.
Important: This method should only be used for very lightweight rugs, such as small kilims or fabric textiles. Test in an inconspicuous area first, as adhesive may damage some wall finishes or rug materials.
Method 7: Professional Installation / Conservation Mounting

Best For: Valuable antique rugs, museum-quality pieces, heirloom textiles
Pros:
- Preservation-focused techniques
- Proper archival materials
- Expert handling of valuable pieces
Cons:
- Most expensive option
- Requires finding a qualified specialist
When to Consider Professional Help:
- For rugs valued over $1,000
- For antique or fragile textiles
- For complex installation situations
- For proper conservation and preservation
Professional textile conservators and specialized framers can provide services including:
- Proper cleaning before mounting
- Custom-built support systems
- Archival mounting materials
- UV-protective framing
- Appropriate tension distribution
Comparison of Hanging Methods
| Method | Best For | Ease of Install | Permanence | Potential Risk | Cost (Approx.) |
|---|---|---|---|---|---|
| Velcro | Lightweight to medium rugs | Easy | Semi-permanent | Low to Medium | $15-30 |
| Rod & Casing | Medium to heavy rugs | Moderate | Permanent | Low | $30-100 |
| Tack Strips | Heavy rugs | Difficult | Permanent | High | $10-20 |
| Specialty Clips | Medium rugs | Easy | Temporary | Medium | $20-50 |
| Frame Mounting | Valuable/fragile rugs | Difficult | Permanent | Low | $100-300+ |
| Command Strips | Very lightweight rugs | Very Easy | Temporary | Medium | $10-20 |
| Professional | Valuable/antique rugs | None (hired) | Varies | Very Low | $200-1000+ |
How to Hang VERY Heavy Rugs
When it comes to hanging Moroccan rugs or other heavy textiles weighing more than 15 pounds, special considerations are essential:
- Always mount into wall studs or use heavy-duty wall anchors appropriate for the weight.
- Use multiple support methods in combination when possible:
- Rod and casing at the top
- Support strips on sides or bottom
- Consider weight distribution tools like:
- Toggle bolts (can hold 50+ pounds in drywall)
- Molly bolts for plaster walls
- Concrete anchors for masonry
- Add a bottom support rod for exceptionally heavy rugs, creating even weight distribution.
- Consult a professional for rugs over 25 pounds, especially in homes with plaster walls.
Pro Tip: For extremely heavy wall hanging rugs, a French cleat mounting system (similar to those used for heavy mirrors and cabinets) can provide exceptional support when properly installed into wall studs.
Avoiding Damage to Your Rug and Wall
Protecting Your Rug
- Choose the right method for your specific rug type and weight
- Avoid concentrated stress points that can lead to tearing
- Distribute weight evenly across the top or around the perimeter
- Consider rotation every 6-12 months to prevent uneven fading
- Keep away from direct sunlight which can cause color fading
- Periodically remove and gently clean both the rug and wall area
Protecting Your Wall
- Use appropriate anchors for your wall type and the rug’s weight
- Find studs whenever possible for secure mounting
- Prepare surfaces properly before applying adhesives
- Check weight ratings on all hardware and components
- Consider moisture issues if hanging in bathrooms or humid areas
Frequently Asked Questions
Can I hang a rug without putting holes in the wall?
Yes, for lightweight rugs (under 5 pounds), you can use removable adhesive options like Command strips or special adhesive hooks. For slightly heavier rugs, tension rods in door frames or between bookshelves can work. However, all damage-free methods have significant weight limitations and may not be reliable long-term.
How much weight can Command Strips hold for a rug?
Standard Command strips typically support 4-5 pounds maximum when used according to directions. For rugs, this practically limits you to small textile pieces, lightweight kilims, or fabric rugs. Never exceed the manufacturer’s weight rating, and use multiple strips spaced appropriately for better distribution.
What’s the best way to hang an Oriental/Persian rug?
Valuable Oriental rugs should ideally be hung using a sleeve and rod method or professionally mounted. Avoid adhesives directly on the rug and never use tack strips which can damage delicate fibers. For antique or particularly valuable pieces, consultation with a textile conservator is recommended to preserve the rug’s integrity and value.
How do I hang a rug on a brick wall?
For brick walls, you’ll need:
- Masonry drill bit appropriate for brick
- Masonry anchors (plastic or metal expansion anchors)
- Patience for careful drilling to avoid cracking the brick
The rod and casing method works best for brick walls, as the mounting points can be precisely placed in mortar joints when possible to minimize brick damage.
My hanging rug is sagging, what should I do?
Sagging typically occurs when:
- The weight isn’t properly distributed
- The mounting method isn’t appropriate for the rug’s weight
- The rug itself is stretching due to gravity
Solutions include:
- Adding additional support points
- Switching to a more substantial hanging method
- Adding a bottom support rod to maintain tension
- Removing and re-hanging with proper distribution
With these methods and considerations, you’re well-equipped to successfully hang any rug on your wall. Remember that the effort put into proper installation will protect both your wall and your textile investment while creating a stunning focal point in your home. Whether you’re displaying a cherished Moroccan rug or experimenting with textile art, the right hanging method makes all the difference in creating a professional, gallery-worthy display.
